PRIMER MENU
Ahora nos vamos con el primer menu y su codigo:1.- ve a diseño >> Edicion de html y con ctrl+ mas la tecla F busca el siguiente codigo:
/* Content
----------------------------------------------- */
2.- Copia el codigo de navegacion del menu y lo pegas abajo del codigo anterior osea /* Content
#naviday {
font-size: 10px;
letter-spacing: 1px;
line-height: 150%;
text-align:left;
color: #aaa;
padding-left:18px;
text-decoration: none;
border-bottom: 1pt solid #A9E2F3;
color: #CEECF5;
background:#ffffff;
display: block;text-transform: ;
}
#naviday:hover {
letter-spacing: 2px;
background: #F6CEF5;
color: #aaa;
}
3.- Guarda tu plantilla y ahora ve de nuevo a Diseno >> Elementos de pagina y Añadir un gadget html
4.- Copia este codigo y pegalo en el gadget
<a id="naviday" href="DIRECCION DE TU ENTRADA" title="TITLE">TITULO DE TU ENTRADA</a>
**Agrega este codigo cuantas veces necesites ponerlo.
SEGUNDO MENU
1.- ve a diseño >> Edicion de html y con ctrl+ mas la tecla F busca el siguiente codigo:
/* Content
----------------------------------------------- */
2.- Copia el codigo de navegacion del menu y lo pegas abajo del codigo anterior
#naviday {
display:table-cell;
vertical-align: middle;
height:55px;
margin:-1px;
border-left:1px solid #ffffff;
padding:4px 6px 5px 5px;
color: #ffffff;
background: #000;
-webkit-transition: all 0.9s ease;
-moz-transition: all 0.9s ease;
transition: all 0.9s ease;
}
#naviday:hover {
border-left:3px solid #ffffff;
color: #000000;
background: #BDBDBD;
-moz-border-radius: 0px 0px 70px 70px;
-webkit-border-radius: 0px 0px 70px 70px;
border-radius: 0px 0px 70px 70px;
-webkit-transition: all 0.9s ease;
-moz-transition: all 0.9s ease;
transition: all 0.9s ease;
}
3.- Guarda tu plantilla y ahora ve de nuevo a Diseno >> Elementos de pagina y Añadir un gadget html
4.- Copia este codigo y pegalo en el gadget
<a id="naviday" href="DIRECCION DE TU ENTRADA" title="TITLE">TITULO DE TU ENTRADA</a>
**Agrega este codigo cuantas veces necesites ponerlo.
TERCER MENU
1.- ve a:
Edicion >> Elementos de pagina>> Anadir gadget html
2.- Copia este codigo y pegalo en el gadget
morado: color del primer fondo
Rosa: color del segundo fondo
azul: Url o direcion de tu entrada
ve a:
2.- Copia este codigo y pegalo en el gadget
Rosa: Url o direccion de tu fondo
Azul: Lo grueso del borde, el tipo de borde y el color del borde
Naranja: Direcciones de tus entradas
Lila: El titulo de tu entrada
verde: Direccion de tu gif.
<style type="text/css">;
/*Credits: Dynamic Drive CSS Library */
/*URL: http://www.dynamicdrive.com/style/ */
.sidebarmenu ul{
width:250;
text align:center;
list-style-type: none;
font: normal 13px Century gothic;
}
.sidebarmenu ul li{
position: relative;
}
/* Top level menu links style */
.sidebarmenu ul li a{
display: block;
overflow: auto; /*force hasLayout in IE7 */
color: white;
text-align:center;
text-decoration: none;
padding: 0px;
}
.sidebarmenu ul li a:link, .sidebarmenu ul li a:visited, .sidebarmenu ul li a:active{
background-color: #CDF0FF; /*background of tabs (default state)*/}
.sidebarmenu ul li a:visited{
color: white;}
.sidebarmenu ul li a:hover{
background-color: #FDCDFF;}
/* Holly Hack for IE \*/
* html .sidebarmenu ul li { float: left; height: 1%; }
* html .sidebarmenu ul li a { height: 1%; }
/* End */
</style>
<script type="text/javascript">
//Nested Side Bar Menu (Mar 20th, 09)
//By Dynamic Drive: http://www.dynamicdrive.com/style/
var menuids=["sidebarmenu1"] //Enter id(s) of each Side Bar Menu's main UL, separated by commas
function initsidebarmenu(){
for (var i=0; i<menuids.length; i++){
var ultags=document.getElementById(menuids[i]).getElementsByTagName("ul")
for (var t=0; t<ultags.length; t++){
ultags[t].parentNode.getElementsByTagName("a")[0].className+=" subfolderstyle"
if (ultags[t].parentNode.parentNode.id==menuids[i]) //if this is a first level submenu
ultags[t].style.left=ultags[t].parentNode.offsetWidth+"px" //dynamically position first level submenus to be width of main menu item
else //else if this is a sub level submenu (ul)
ultags[t].style.left=ultags[t-1].getElementsByTagName("a")[0].offsetWidth+"px" //position menu to the right of menu item that activated it
ultags[t].parentNode.onmouseover=function(){
this.getElementsByTagName("ul")[0].style.display="block"
}
ultags[t].parentNode.onmouseout=function(){
this.getElementsByTagName("ul")[0].style.display="none"
}
}
for (var t=ultags.length-1; t>-1; t--){ //loop through all sub menus again, and use "display:none" to hide menus (to prevent possible page scrollbars
ultags[t].style.visibility="visible"
ultags[t].style.display="none"
}
}
}
if (window.addEventListener)
window.addEventListener("load", initsidebarmenu, false)
else if (window.attachEvent)
window.attachEvent("onload", initsidebarmenu)
</script>
<div class="sidebarmenu">
<ul id="sidebarmenu1">
<li><a href="LINK DE TU ENTRADA">♥HOME♥</a></li>
<li><a href="LINK DE TU ENTRADA">Acerca de mi ♥</a></li>
<li><a href="LINK DE TU ENTRADA">♥Tutorial♥</a></li>
<li><a href="LINK DE TU ENTRADA"> ♥Chat♥</a></li>
</ul>
</div>
morado: color del primer fondo
Rosa: color del segundo fondo
azul: Url o direcion de tu entrada
ve a:
Edicion >> Elementos de pagina>> Anadir gadget html
2.- Copia este codigo y pegalo en el gadget
<center><div style="background:url(URL DE TU BACKGROUND);width:210px;border:2px solid #ccc;padding:5px;"><a href="URL DE TU BLOG">hOME</a> <img src="http://www.drikoti.net/Dri/CuteChibbi/bolinha-rosa.gif"/> <span id="goog_1755542995"></span><a href="URL DE TU ENTRADA">TUTURIAL</a> <span id="goog_1755542996"></span><img src="http://www.drikoti.net/Dri/CuteChibbi/bolinha-rosa.gif"/> <a href="URL DE TU ENTRADA">CREDITOS</a> <img src="http://www.drikoti.net/Dri/CuteChibbi/bolinha-rosa.gif"/></center>
Rosa: Url o direccion de tu fondo
Azul: Lo grueso del borde, el tipo de borde y el color del borde
Naranja: Direcciones de tus entradas
Lila: El titulo de tu entrada
verde: Direccion de tu gif.
QUINTO MENU


Ve a diseno >> Edicion de html >> editar plantilla
y busca ]]></b:skin>
cuando lo encuentres pega este codigo justo arriba del codigo anterior
Ahora busca este codigo </body>
y pega este codigo antes de </body>
Azul: Color del fondo del recuadro
LIla: Color del borde
rosa: color del texto
Rojo: color de la sobra al rotar
Por ultimo da vista previa y guarda ^^
y busca ]]></b:skin>
cuando lo encuentres pega este codigo justo arriba del codigo anterior
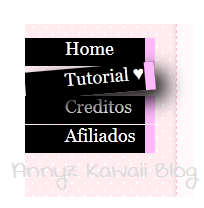
/* LIST #8 */
#list8 { }
#list8 ul { list-style:none;}
#list8 ul li { font-family:Georgia,serif,Times; font-size:18px;margin:1px; }
#list8 ul li a { display:block; width:80px; height:28px; background-color:#000000; border-right:10px solid #FFFFFF; padding-left:40px;
text-decoration:none; color:#FFFFFF; }
#list8 ul li a:hover { -moz-transform:rotate(-5deg); -moz-box-shadow:10px 10px 20px #000000;
-webkit-transform:rotate(-5deg); -webkit-box-shadow:10px 10px 20px#000000;
transform:rotate(-5deg); box-shadow:10px 10px 20px #000000; }
Ahora busca este codigo </body>
y pega este codigo antes de </body>
<div style='display:scroll; position:fixed; top:150px; left:-40px;'>
<div id='list8'>
<ul>
<li><a href='URL DE TU BLOG'>Home</a></li>
<li><a href='URL DE TU ENTRADA'>Tutorial</a></li>
<li><a href='URL DE TU ENTRADA'>creditos</a></li>
<li><a href='URL DE TU ENTRADA'>afiliados</a></li>
</ul>
</div>
</div>
Azul: Color del fondo del recuadro
LIla: Color del borde
rosa: color del texto
Rojo: color de la sobra al rotar
Por ultimo da vista previa y guarda ^^


No hay comentarios: